Create a folder for your project, mine called slim
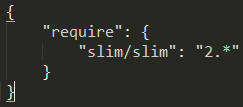
create a composer.json in the directory and open up your Command Prompt / Terminal and run composer install. Later you should have something similar to Screenshot #2.
Screenshot #1
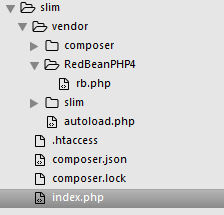
Create a folder named RedBeanPHP4 in vendor directory and extract download zip file above and copy the rb.php into slim/vendor/RedBeanPHP4 – see Screenshot #2.
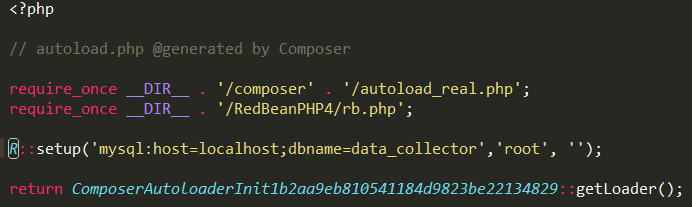
Include the rb.php in slim/vendor/autoloader.php
Then, add MySQL connection settings.
Let’s start it!
Create a index.php in slim directory and add the following: Basically what’s in this index.php is to add new user and view a user details.
You may need to create new database, then new table named users. I used the following fields – id, name, email, created and modified
Next, when the database and tables created, you may run http://localhost/slim/users/add/Nasrul Hazim/email@gmail.com and you may want to add more records. Suppose each time new user created, you will be redirected to the view user info page – http://localhost/slim/users/view/1 and see the next screenshot – I only var_dump the user details and you want to add some nice view or probably pass a JSON encoding.
== Microsoft SQL Server ==
Max DB Size: 524,272 TB (32 767 files * 16 TB max file size)
Max Table Size: 524,272 TB
Max Row Size: 8,060 bytes (Unlimited)
Max Columns Per Row: 30,000
Max Blob / Clob Size: 2 GB
Max Char Size: 2 GB
Max Number Size: 126 bits
Min Date Value: 0001
Max Date Value: 9999
Max Column Name Size: 128
== MySQL ==
Max DB Size: Unlimited
Max Table Size: MyISAM storage limits: 256 TB; Innodb storage limits: 64 TB
Max Row Size: 64 KB
Max Columns Per Row: 4,096
Max Blob / Clob Size: 4 GB (longtext, longblob)
Max Char Size: 64 KB (text)
Max Number Size: 64 bits
Min Date Value: 1000
Max Date Value: 9999
Max Column Name Size: 64
== PostgreSQL ==
Max DB Size: Unlimited
Max Table Size: 32TB
Max Row Size: 1.6TB
Max Columns Per Row: 250 – 1600 ( depending on type)
Max Blob / Clob Size:
– 1 GB (text, bytea)[http://grokbase.com/t/postgresql/pgsql-general/12bsww982c/large-insert-leads-to-invalid-memory-alloc] – stored inline or
– 4 TB (stored in pg_largeobject)[http://www.postgresql.org/docs/9.3/static/lo-intro.html]
Max Char Size: 1GB
Max Number Size: Unlimited
Min Date Value: −4,713
Max Date Value: 5,874,897
Max Column Name Size: 63
== Oracle ==
Max DB Size: Unlimited (4 GB * block size per tablespace)
Max Table Size: 4 GB * block size (with BIGFILE tablespace)
Max Row Size: 8 KB
Max Columns Per Row: 1,000
Max Blob / Clob Size: 128 TB
Max Char Size: 32,767 B
Max Number Size: 126 bits
Min Date Value: −4712
Max Date Value: 9999
Max Column Name Size: 30
== SQLite ==
Max DB Size: 128 TB (231 pages * 64 KB max page size)
Max Table Size: Limited by file size
Max Row Size: Limited by file size
Max Columns Per Row: 32,767
Max Blob / Clob Size: 2 GB
Max Char Size: 2 GB
Max Number Size: 64 bits
Min Date Value: No DATE type
Max Date Value: No DATE type
Max Column Name Size: Unlimited
Find the [TARGET_DATABSE] and replace it with the target database
Execute the query
Copy the result and execute each of the SQL statement to remove the index
SELECT
CONCAT(GROUP_CONCAT('ALTER TABLE `',tab_left.TABLE_NAME,'` DROP INDEX ',
(
CASE
WHEN tab_left.COLUMNS = tab_right.COLUMNS AND (tab_left.IS_UNIQUE = tab_right.IS_UNIQUE)
THEN GREATEST(tab_left.INDEX_NAME, tab_right.INDEX_NAME)
ELSE tab_left.INDEX_NAME
END
) SEPARATOR ';n')) AS q
FROM
(
SELECT
TABLE_NAME,
CONCAT('`', INDEX_NAME, '`') AS INDEX_NAME,
INDEX_TYPE, IF(NON_UNIQUE, 'NO', 'YES') IS_UNIQUE,
GROUP_CONCAT(
CONCAT(
'`', COLUMN_NAME, '`') ORDER BY
IF( INDEX_TYPE = 'BTREE', SEQ_IN_INDEX, 0),
COLUMN_NAME) COLUMNS FROM information_schema.STATISTICS
WHERE TABLE_SCHEMA = '[TARGET_DATABASE]' AND TABLE_NAME = TABLE_NAME GROUP BY TABLE_NAME, INDEX_NAME, INDEX_TYPE, NON_UNIQUE) AS tab_left
INNER JOIN (SELECT TABLE_NAME, CONCAT('`', INDEX_NAME, '`') AS INDEX_NAME, INDEX_TYPE, IF(NON_UNIQUE, 'NO', 'YES') IS_UNIQUE,
GROUP_CONCAT(CONCAT('`', COLUMN_NAME, '`') ORDER BY IF(INDEX_TYPE = 'BTREE', SEQ_IN_INDEX, 0), COLUMN_NAME) COLUMNS
FROM information_schema.STATISTICS
WHERE TABLE_SCHEMA = '[TARGET_DATABASE]' AND TABLE_NAME = TABLE_NAME
GROUP BY TABLE_NAME, INDEX_NAME, INDEX_TYPE, NON_UNIQUE) AS tab_right
ON tab_left.TABLE_NAME = tab_right.TABLE_NAME AND tab_left.INDEX_NAME != tab_right.INDEX_NAME
AND tab_left.INDEX_TYPE = tab_right.INDEX_TYPE AND CASE WHEN tab_left.COLUMNS = tab_right.COLUMNS
AND (tab_left.IS_UNIQUE = 'NO' OR tab_left.IS_UNIQUE = tab_right.IS_UNIQUE)
THEN TRUE WHEN tab_left.INDEX_TYPE = 'BTREE' AND INSTR(tab_right.COLUMNS, tab_left.COLUMNS) = 1 AND tab_left.IS_UNIQUE = 'NO'
THEN TRUE ELSE FALSE END GROUP BY tab_left.TABLE_NAME;
Here, I’m going to show the simplest way to connect to the PHP in Android – receiving JSON(JavaScript Object Notation) upon successful. You could make a simple JSON response in a PHP script like the following and deploy it to the server / localhost.
I’m creating a new Android project in Eclipse and extending the AsyncTask class in order to connect to PHP, and using HtppGet to make a connection to the server(can be Windows / Linux base).
Following are the screenshot from my Galaxy Nexus & result logged in Eclipse.
Once you able to received result / response, next step you can further develop apps for more complex operations with PHP, MySQL or any further processing on the server side.
Simple UI – a button with click event to connect to the server.Logged result – JSON.toString();
The numbering(in red) from the above Figure 1.0 is explained below:
1, 5, 9. The server caches information in memory as a result of GRANT, CREATE USER , CREATE SERVER, and INSTALL PLUGIN statements. This cached memory can be freed by “flush privileges” command. 2, 4, 6, 8, 10. Acknowledgment message from server. 3. Create user with username ‘super’ and host ‘%’. The host ‘%’ indicate its a wildcard. That means this user ‘super’ can log into the mysql server from any remote client. This ‘super’ user is not tied to any particular host. If this line gives error message try again after restarting mysql. 7. GRANT ALL privileges to user ‘super’ at host ‘%’.
Next, restart the server to make sure the changes took effect.
Figure 2.0
The numbering(in red) from the above Figure 2.0 is explained below: 11, 13…

 Basically what’s in this index.php is to add new user and view a user details.


